Pages

Showing posts with label collage. Show all posts

Sunday, 16 March 2014

New month - new art journal

Hi everyone,

It has been quiet on the blog front but I have been busy. As Spring is starting to bloom and the evenings are becoming lighter, I have started a new art journal and painted several new canvases this month.

R and I also decided to start an Instagram account called #andyandrachael where we try to post daily photographs of projects and things that inspire us. Please feel free to check it out if you are interested. We would love to see you there...

Here are a few photographs of the journal so far:


As you all know, nature is a big source of inspiration of mine and this has crept inside the journal


I was really inspired when I revisited the paintings I created on Flora Bowley's ecourse Bloom True last year and this double page spread reflects that inspiration.


This source of inspiration continued further last weekend when I added to some new canvases  It felt brilliant to be working on canvas again and to watch how they are developing (as well as getting messy!). Lucky for me, my wife is very supportive when I am in the painting zone!!! 


Hope that Spring is inspiring you too.

Andy

Wednesday, 16 October 2013

The Great Big Stitched Postcard Swap

Hi everyone, 


After over two weeks of marking madness and late evenings at work, I managed to meet the Postcard swap deadline for Celebration at Do What You Love. My stitched postcard is currently winging its way to New York, a place that holds wonderful memories for me of past vacations. When I registered for the swap, I had a reasonably manageable timetable at school. However, just a few weeks into the new term, it is as manic as ever! Creating this piece of artwork after school assisted me to shrug off that busy schedule and was a most enjoyable process. It was fun bringing out my partner's sewing machine. Stitching is a relatively new thing for me but I feel I achieved a first, with a little guidance. This is the first time I have been involved in an online swap; another personal goal achieved. 

Apart from the postcard, I have only been able to paint at the weekends since starting Flora's True Bloom e-course. I hope to catch up this week and post what I am up to by the weekend (fingers crossed!).

So, without further ado, here is a run down of how my postcard was put together.


First thing I did was to break out my new arty squeegee. I created a burst of colour on A4 card paper using just golden fluid acrylic primary colours. Would you like a demonstration on video?? Do let me know by leaving a comment. Along with this, I had some off cuts of fabric; it is like a burlap but a lot stiffer material. To add a background texture, I used a stamper that has an Islamic design on it. 


While the paint on the burlap was drying, I hand cut out circles of different sizes. Then I tore the fabric into strips. Time for some creative fun! I had it all spread out on the kitchen floor and moved it around for an hour of so before I felt it was right. Once I had decided on the placement, I glued it all together using PVA. 


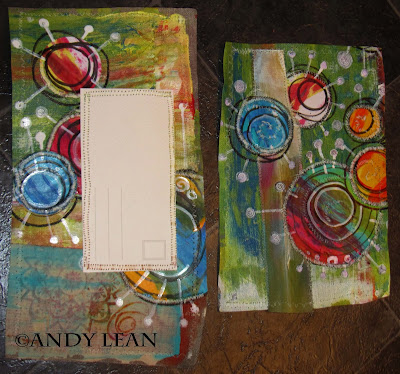
Once that had dried, it was time to add some details. I used a series of different nibs on my Sharpie pens and a Tippex. The inspiration for my celebration themed postcard were images of fireworks, being a reference to new beginnings and friendship. The formed images looked like seed pods.


I then separated it into several pieces. It was at this point, I remembered the one rule of the swap to follow... it had to have sewing on it. Now I do not proclaim myself an excellent sewer and I decided to have a lesson on the sewing machine. I am fortunate that my wife is fantastic at textiles and she showed me how to use the machine and then I stitched into each section. Thank you wife for having the patience!


Next, l brought the pieces together and added the last details. Here is the front and back of the postcard before I stitched it together.


This is the back:


This is the front:


I have to admit to being very happy with the result. Attempting something new without letting my style of work slip was very satisfying, and I hope the recipient in New York enjoys receiving it.

As promised, I will post again soon with the beginnings of the Bloom True canvases. I am relishing the journey.

Hope everyone is having a great week. 

Andy


Thursday, 15 August 2013

Art that Sells - weeks 4 and 5

Hi Everybody

I hope that this posting finds you all well. It has been great to have the time to create so many blog posts. The summer holidays are racing by.

As promised, here are the two final assignments of the Lilla Rogers Make Art That Sells e-course. 

In week 4, we were asked to produce a piece of wall art. It  had to have very specific colours and the starter activity was to gather collections that demonstrated those colour combinations. This was a fun activity.


Over the course of that week, I produced my canvas using these colours. This was a definite challenge for me. I have to admit using these colours together was not a natural thing for me, though I did warm to them in the end. I also used stamping techniques on the canvas to create texture. This was also a first for me but I was pleased with the end results.


The only thing that I would change about this painting is the text. I don't usually use text on an image, as I like people to look at my paintings and make up their own minds about its subject matter. On review, I am going to remove the text and I will post the results at a later date. It was really interesting to look into the wall art market, and to think about the type and styles of work that people will buy to place in frames and hang.

As a side line to the painting, I created three collages. Originally they were going to be part of the painting and although I didn't use them in the end, I do like them and may make some more for another project. With art, nothing is ever wasted!


In week 5, the last week of the course, we were asked to create a 'lush' design that could be used on a range of gifts. The starter activity was to create images of our personal collections. I think I have mentioned before on this blog that I have a big passion for fossils, minerals and natural forms, so I produced drawings and photographs from my collection.


At this stage, I wasn't quite sure how to interpret a 'lush' design but I then came up with the idea of inserting my fossil drawings into images of bottles I have also collected and this created a busy, colourful design. To do this, I had to use Photoshop and Illustrator, the effect is certainly very different than my normal use of drawing and paint.

Here's a section of my final design. 


It was great to do something different and fascinating to read the enormous amount of information provided by Lilla. 

In respect of the course I found it very challenging, as several of the assignments were outside of my normal area of expertise, but I enjoyed being stretched out of my comfort zone. I am now able to view art in a much larger picture seeing it applied to the variety of goods for which Lilla Rogers is an agent. If any of you want to make art to sell, I cannot recommend this course enough. Each area of the market place is thoroughly covered by examples, interviews and contacts. Mind-blowing information from which I have gained so much. Thanks to Lilla and Beth for this amazing course.

I hope that you have found this interesting. I will post again soon with the latest developments from the Man Cave.

Andy