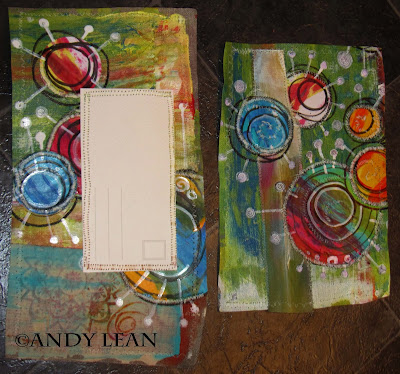
After over two weeks of marking madness and late evenings at work, I managed to meet the Postcard swap deadline for Celebration at Do What You Love. My stitched postcard is currently winging its way to New York, a place that holds wonderful memories for me of past vacations. When I registered for the swap, I had a reasonably manageable timetable at school. However, just a few weeks into the new term, it is as manic as ever! Creating this piece of artwork after school assisted me to shrug off that busy schedule and was a most enjoyable process. It was fun bringing out my partner's sewing machine. Stitching is a relatively new thing for me but I feel I achieved a first, with a little guidance. This is the first time I have been involved in an online swap; another personal goal achieved.
Apart from the postcard, I have only been able to paint at the weekends since starting Flora's True Bloom e-course. I hope to catch up this week and post what I am up to by the weekend (fingers crossed!).
So, without further ado, here is a run down of how my postcard was put together.
First thing I did was to break out my new arty squeegee. I created a burst of colour on A4 card paper using just golden fluid acrylic primary colours. Would you like a demonstration on video?? Do let me know by leaving a comment. Along with this, I had some off cuts of fabric; it is like a burlap but a lot stiffer material. To add a background texture, I used a stamper that has an Islamic design on it.
While the paint on the burlap was drying, I hand cut out circles of different sizes. Then I tore the fabric into strips. Time for some creative fun! I had it all spread out on the kitchen floor and moved it around for an hour of so before I felt it was right. Once I had decided on the placement, I glued it all together using PVA.
Once that had dried, it was time to add some details. I used a series of different nibs on my Sharpie pens and a Tippex. The inspiration for my celebration themed postcard were images of fireworks, being a reference to new beginnings and friendship. The formed images looked like seed pods.
I then separated it into several pieces. It was at this point, I remembered the one rule of the swap to follow... it had to have sewing on it. Now I do not proclaim myself an excellent sewer and I decided to have a lesson on the sewing machine. I am fortunate that my wife is fantastic at textiles and she showed me how to use the machine and then I stitched into each section. Thank you wife for having the patience!
Next, l brought the pieces together and added the last details. Here is the front and back of the postcard before I stitched it together.
This is the back:
This is the front:
I have to admit to being very happy with the result. Attempting something new without letting my style of work slip was very satisfying, and I hope the recipient in New York enjoys receiving it.
As promised, I will post again soon with the beginnings of the Bloom True canvases. I am relishing the journey.
Hope everyone is having a great week.
Andy


1 comment:
Fab-u-lus!!! and yes please to a video. I love that you show your process Andy.
Post a Comment